The last post (January 2025) described how to install a WALT server machine. Right after installation, it was already usable for experiments with virtual nodes. Today we will connect real equipment (switches and Raspberry Pi nodes) to this platform.
As usual, you can get more details in the documentation pages for switch and node installation.
Connecting a network switch
For this kind of mini-platform, we recommend Netgear GS110TP switches. They provide PoE (Power-over-Ethernet) and they allow remote management using SNMP, two optional but highly recommended features WALT can make use of.
In any case, WALT automatically detects the network devices when they send their first DHCP request, so let’s start monitoring platform logs1:
etienne@asus-minipc:~$ walt log show --platform --realtime
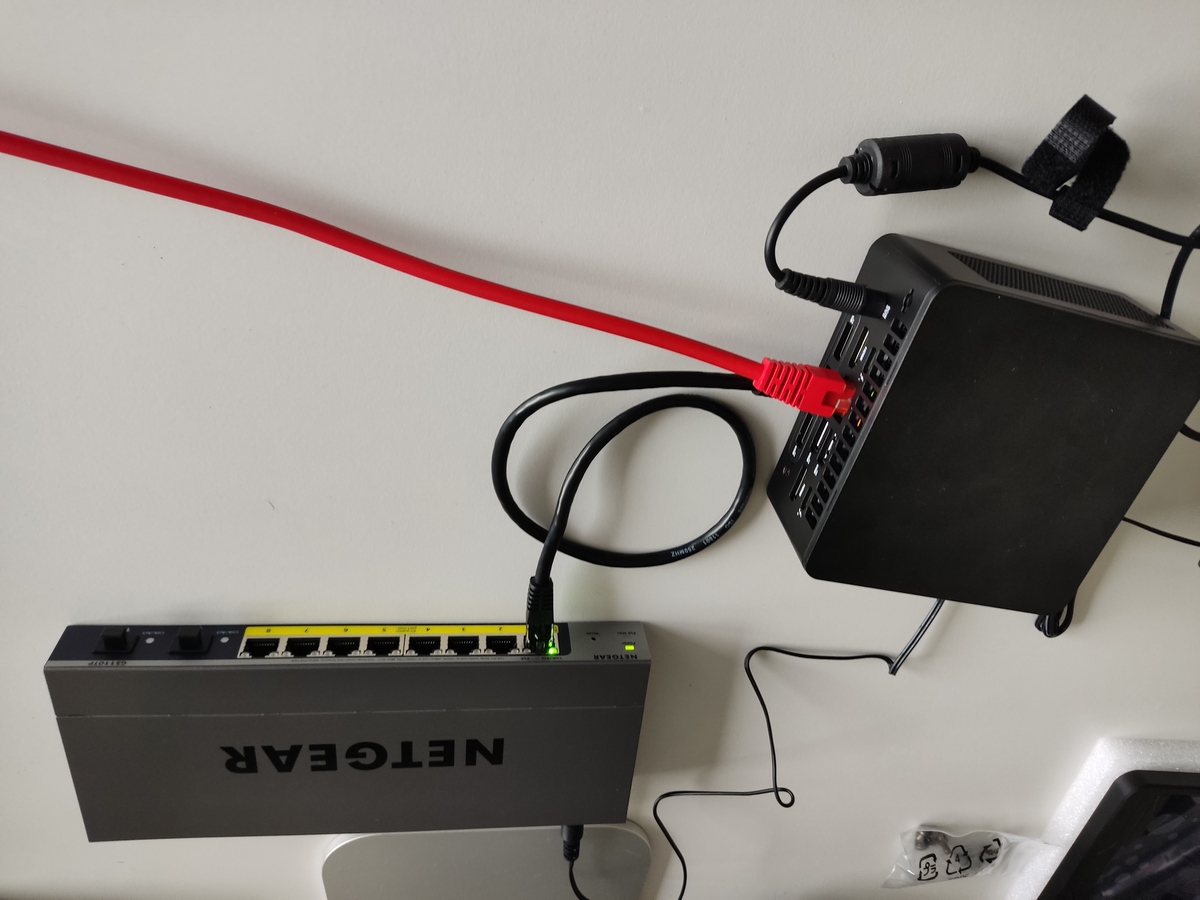
And we can connect the switch on the bottom ethernet port of the mini-pc (black cable). Reminder: last month we decided to use this bottom ethernet port for the WALT network, since the top one is used for the local LAN (red cable).
After a few tens of seconds (or a few minutes if the switch was powered off), a log line appears:
etienne@asus-minipc:~$ walt log show --platform --realtime
13:43:59.622447 walt-server.platform.devices -> new device name=gs110tpv3-1b8b26 type=unknown mac=54:07:7d:1b:8b:26 ip=192.168.108.4
^C
etienne@asus-minipc:~$
WALT named this device “gs110tpv3-1b8b26”, but we can rename it with a shorter name:
etienne@asus-minipc:~# walt device rename gs110tpv3-1b8b26 sw1-gs110tp
etienne@asus-minipc:~#
Easy, isn’t it?
Connecting a Raspberry Pi node
We can now connect a Raspberry Pi node. I selected a Raspberry Pi 3B+ board with no SD card.
Let’s start again the command for monitoring logs:
etienne@asus-minipc:~$ walt log show --platform --realtime
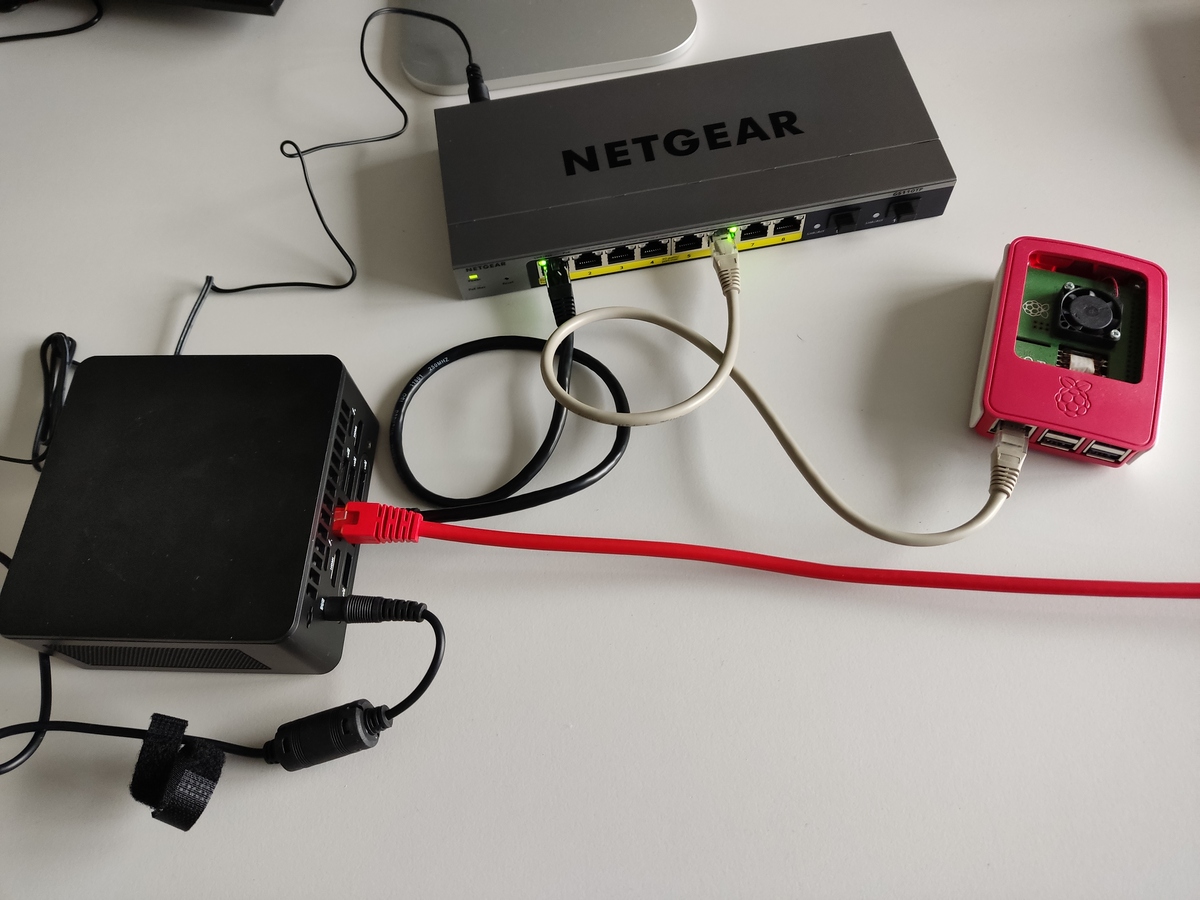
Then we connect the Raspberry pi board:
And here is what happens:
etienne@asus-minipc:~# walt log show --platform --realtime
14:18:37.966345 walt-server.platform.devices -> new device name=unknown-0daea1 type=unknown mac=b8:27:eb:0d:ae:a1 ip=192.168.108.5
14:18:37.973397 walt-server.platform.devices -> Device unknown-0daea1 is a walt node of type 'rpi-3-b-plus'.
14:18:37.974369 walt-server.platform.devices -> Trying to download a default image for 'rpi-3-b-plus' nodes: waltplatform/rpi-3-b-plus-default:latest...
14:18:57.605702 walt-server.platform.devices -> Image waltplatform/rpi-3-b-plus-default:latest was downloaded successfully.
14:18:57.610591 walt-server.platform.devices -> renamed unknown-0daea1 to node-0daea1 for clarity
14:18:57.616658 walt-server.platform.devices -> new node (device type previously unknown) name=node-0daea1 model=rpi-3-b-plus mac=b8:27:eb:0d:ae:a1 ip=192.168.108.5
14:19:46.670138 walt-server.platform.nodes -> node node-0daea1 is booted
These logs are quite explicit:
- The Raspberry Pi was first registered as a device with
type=unknown(same as the switch) but, shortly after that, WALT identified it is actually a node of type ‘rpi-3-b-plus’. - Since it was the first time this kind of node was detected on the platform, a default OS image has been downloaded from the docker hub.
- After 50 more seconds, the new node was booted with its default image.
Let’s rename it too.
etienne@asus-minipc:~# walt node rename node-0daea1 rpi3bp
etienne@asus-minipc:~#
Now, guess what will appear if I type walt node show…
etienne@asus-minipc:~# walt node show

You currently own the following nodes:

name    type     model      image              ip             netsetup  booted
------  -------  ---------  -----------------  -------------  --------  ------
vnode1  virtual  pc-x86-64  pc-x86-64-default  192.168.108.2  LAN       yes
vnode2  virtual  pc-x86-64  pc-x86-64-default  192.168.108.3  LAN       yes

Re-run with --all to see all available nodes.
Type `walt help show node-ownership` for help.
etienne@asus-minipc:~#
You guessed wrong, right? We still have no rpi3bp listed there, only the 2 virtual nodes we created last time!
This is because walt node show only prints the nodes I own, and I do not own rpi3bp yet. Actually, WALT has no idea which user connected this board, so why would this node be mine?
Note that if I had typed walt node show --all instead, it would be listed.
But let’s “acquire” this node and retry walt node show then:
etienne@asus-minipc:~# walt node acquire rpi3bp
Cloned rpi-default:latest, a defaut image for rpi-[b[-plus]|2-b|3-b[-plus]|4-b,400],qemu-arm-[32|64].
Node rpi3bp will now boot rpi-default:latest.
Node rpi3bp: rebooted ok.
etienne@asus-minipc:~#
etienne@asus-minipc:~# walt node show

You currently own the following nodes:

name    type      model         image              ip             netsetup  booted
------  --------  ------------  -----------------  -------------  --------  ------
rpi3bp  physical  rpi-3-b-plus  rpi-default        192.168.108.5  LAN       NO
vnode1  virtual   pc-x86-64     pc-x86-64-default  192.168.108.2  LAN       yes
vnode2  virtual   pc-x86-64     pc-x86-64-default  192.168.108.3  LAN       yes

Re-run with --all to see all available nodes.
Type `walt help show node-ownership` for help.
etienne@asus-minipc:~#
Right, it is listed now. Let’s try a shell session:
etienne@asus-minipc:~# walt node shell rpi3bp
Waiting for bootup of node rpi3bp... \
[...]
root@rpi3bp:~# uname -a
Linux rpi3bp 6.1.21-v7+ #1642 SMP Mon Apr  3 17:20:52 BST 2023 armv7l GNU/Linux
root@rpi3bp:~#
That’s working too, of course.
Bonus: using advanced switch features (Network discovery and PoE)
Did you notice that there is only one cable plugged into the Raspberry Pi on the picture? This is because the Netgear GS110TP switch provides PoE (Power-Over-Ethernet), and the Raspberry Pi is equipped with a PoE add-on board, so the ethernet cable can carry both Power and Data. This can simplify the deployment a little.
Another feature this switch provides is remote management, using SNMP: Simple Network Management Protocol. Thanks to this, WALT is able to retrieve some information, such as the neighbors of the switch, and then draw a tree view of the network (we will see that below).
Moreover, when both PoE and SNMP are available, WALT can provide additional features to PoE-powered nodes:
- Hard-reboots: if ever a node is blocked (for instance if you modified the kernel and introduced a bug in it), WALT can force the reboot of a node by sending PoE requests to the switch (power off the relevant switch port, wait 2s, power on).
- Power savings: WALT will automatically power off unused2 PoE-powered nodes.
Let’s configure WALT to enable these features. First, let’s recap the devices WALT knows, up to now:
etienne@asus-minipc:~# walt device show

The WalT network contains the following devices:

name         ip             mac                type             netsetup
-----------  -------------  -----------------  ---------------  --------
rpi3bp       192.168.108.5  b8:27:eb:0d:ae:a1  node (physical)  LAN
vnode1       192.168.108.2  52:54:00:e0:1b:4f  node (virtual)   LAN
vnode2       192.168.108.3  52:54:00:ac:11:fe  node (virtual)   LAN
walt-server  192.168.108.1  52:54:00:79:be:ab  server

[...]

WalT also detected the following devices but could not detect their type:

name         ip             mac                type     netsetup
-----------  -------------  -----------------  -------  --------
sw1-gs110tp  192.168.108.4  54:07:7d:1b:8b:26  unknown  LAN

If one of them is actually a switch, use 'walt device config <name> type=switch' to fix this.

etienne@asus-minipc:~#
We see that for now the type of sw1-gs110tp is unknown, and WALT proposes (last sentence above)
to update this type if relevant.
Indeed, sw1-gs110tp is a switch, so let’s update this:
etienne@asus-minipc:~# walt device config sw1-gs110tp type=switch
Done.
etienne@asus-minipc:~#
etienne@asus-minipc:~# walt device config sw1-gs110tp
Switch sw1-gs110tp has the following config applied:
expose=none
lldp.explore=false
netsetup=LAN
poe.reboots=false
snmp.community=<unspecified>
snmp.version=<unspecified>
etienne@asus-minipc:~#
OK, we see more configuration options now, including SNMP credentials for remote management. But this switch is brand new, so it does not accept SNMP requests yet. We must connect to its web interface and configure it first.
WALT provides handy network redirections to ease this kind of tasks. We just have to update the expose configuration option:
etienne@asus-minipc:~# walt device config sw1-gs110tp expose=80:8081
Done.
etienne@asus-minipc:~#
Now the WALT server is listening on TCP port 8081, and it will redirect client connections to port 80 of sw1-gs110tp.
So, from my laptop, I can open my browser at URL http://<walt-server>:8081 and I will be redirected to the web interface of the switch!
Let’s try:
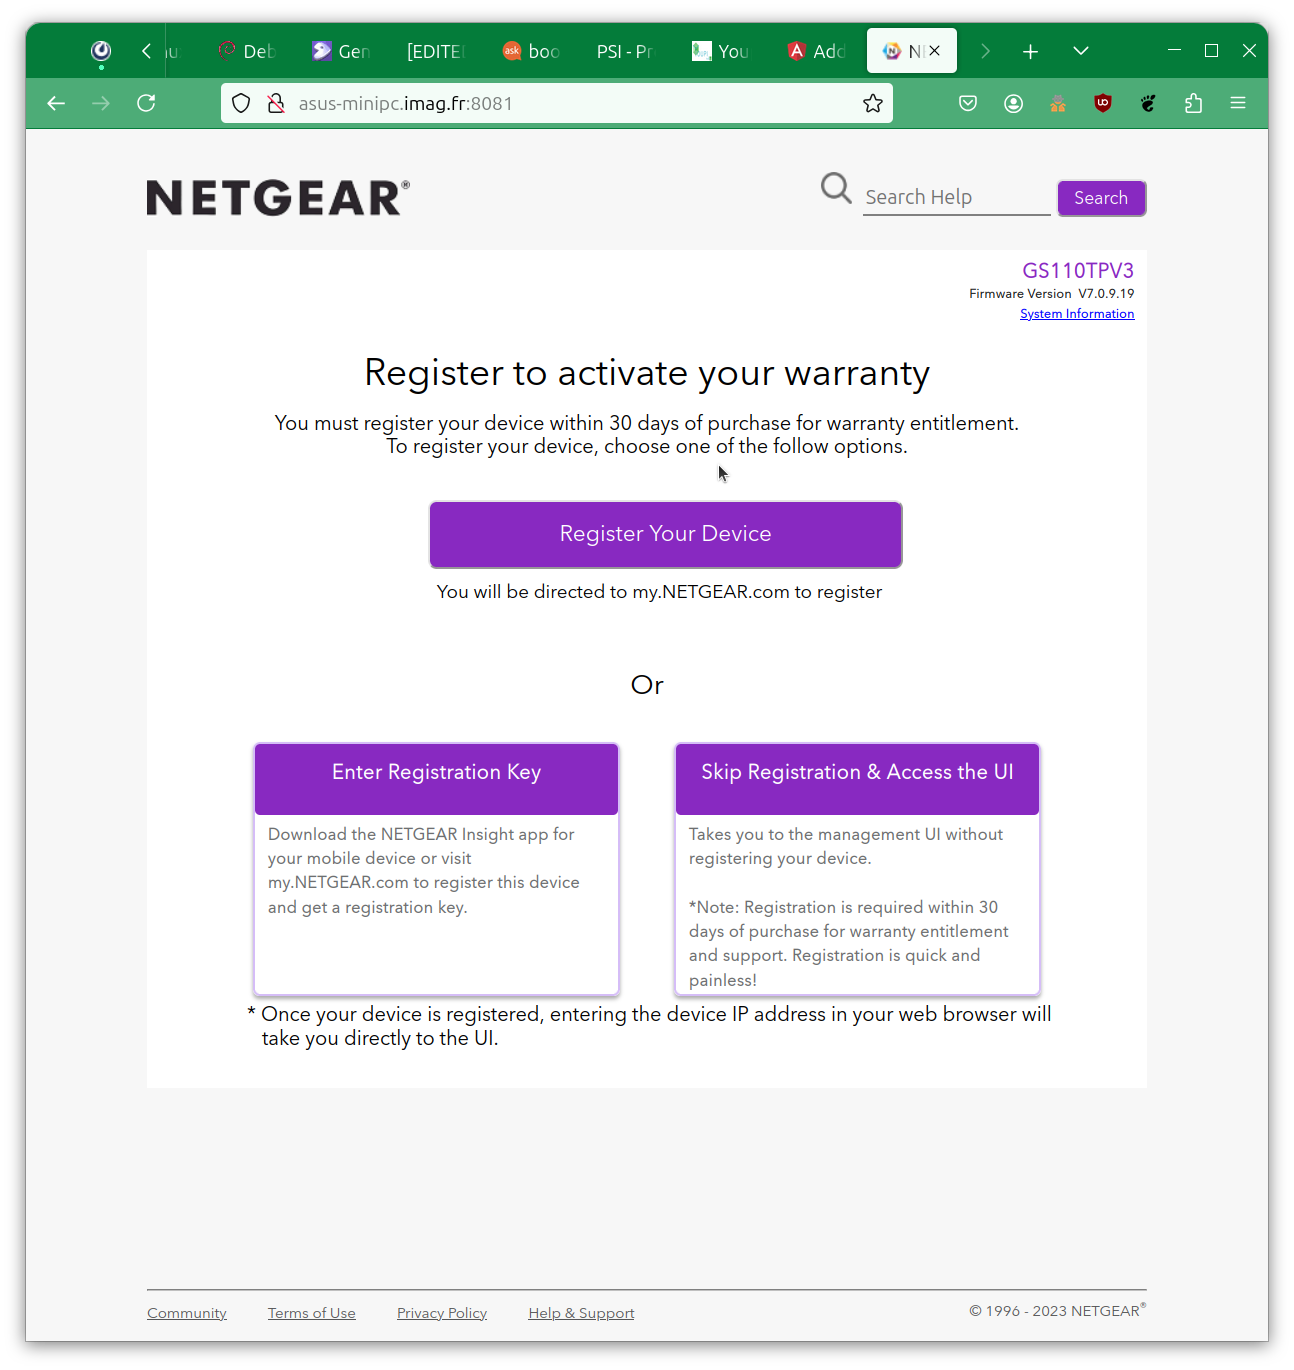
It’s working! So now I can optionally follow Netgear registration procedure or directly access the configuration screens. By selecting menus System and SNMP, I can get to the following interface.
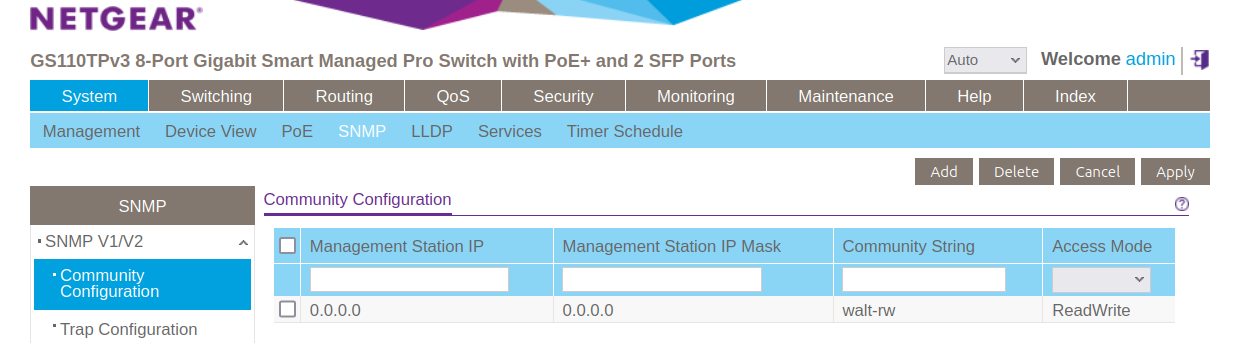
There I register an SNMP community called walt-rw with read-write access mode.
That’s all for the switch configuration, so let’s tell WALT we no longer need the port redirection.
etienne@asus-minipc:~# walt device config sw1-gs110tp expose=none
Done.
etienne@asus-minipc:~#
After this command, server port 8081 is released and can be reused by someone else.
Now, we have to mirror the SNMP credential data on WALT side:
etienne@asus-minipc:~# walt device config sw1-gs110tp snmp.community=walt-rw snmp.version=2
Done.
etienne@asus-minipc:~#
This allows us to enable the optional switch features lldp.explore (for network exploration) and poe.reboots (for PoE hard-reboots and powersave).
etienne@asus-minipc:~# walt device config sw1-gs110tp lldp.explore=true poe.reboots=true
Done.
etienne@asus-minipc:~#
Then we can use walt device rescan to trigger network exploration:
etienne@asus-minipc:~# walt device rescan
Querying sw1-gs110tp             OK (BRIDGE-only data)
Querying walt server             OK
etienne@asus-minipc:~#
And with this data just collected, walt device tree is able to display a network graph:
etienne@asus-minipc:~# walt device tree

-- sw1-gs110tp --
 ├─1: walt-server
 └─6: rpi3bp

note: this view comes from last network scan, issued 6 seconds ago (use 'walt device rescan' to update).
[...]

etienne@asus-minipc:~#
The network graph is obviously very small in this case. (This feature is more useful for a large WALT platform deployed in a building.)
However, the fact WALT knows on which switch port rpi3bp is connected is also useful for PoE hard-reboots (and powersave):
etienne@asus-minipc:~# walt node reboot --hard rpi3bp
Node rpi3bp: rebooted ok.
etienne@asus-minipc:~#
If looking at the switch LEDs, we can verify that they were briefly toggled off during this operation.
Last words
As you can see, WALT offers both a plug-and-play experience for basic functionality and options to handle more advanced features.
Most importantly, did you realise that we instantly turned a Raspberry Pi board into a WALT node by just connecting it to the WALT network? There was no preparation phase of any sort for this board: we even plugged it without a SD card!
To be honest, this level of automation is not provided with all kinds of WALT nodes. Actually, Raspberry Pi 3B+ boards come with a firmware able to boot over the network, so we can bootstrap our own boot procedure. Older models do not offer this feature, so they need a SD card flashed with a network bootloader. Raspberry Pi 4 nodes are also able to boot over the network, but the network boot feature may or may not be activated when you receive the board. So you may have to boot the board once with a SD card, just for activation of this network boot feature, and then the SD card could be removed.
Similarly, PXE-enabled PC machines (x86 64bit CPU) instantly become WALT nodes once connected. Again, the node installation procedure has all the details.
Thanks to Jérémie Finiel for proofreading. If you have questions, we can answer you on the mailing list.
-
If you already plugged a device and forgot to monitor the logs, you can replace option
--realtimeby--history -5m:for instance, to retrieve log lines issued during the last 5 minutes. See the help page for more info. ↩︎ -
A node is considered “unused” if it remained “free” the last two hours. A node is considered “free” if it has not been “acquired” by anyone yet, or if the last owner “released” it (by using
walt node release). ↩︎